Monday, April 23, 2012

March and April... Shake and Make

Hey all... alive here...

So I've decided to do 3 posts that get me caught up. At this point I either get back up to date or stress myself out about making detailed posts about every single thing I have done in March and April (not going to happen...). To be honest, this has been a fantastic lesson in itself. I think I will feel really good about just getting caught up and back on track. I apologize for the lack of detail and when I get a chance I will come back and elaborate. In the meantime, if you have questions about what something is or how I made it or what links are... please comment and I will let you know. Here we go!

In this post I am just going to upload pictures of things that I have made over the last two months (honestly I do not remember the exact dates.) Also... there are more so I will continue to add pictures. Some things I gave away so I will have to find a way to get pics. Thanks for your patience! 

Photo I took at my sister's house. Edited with Instagram iPhone app.  
Made this crocheted wrap bracelet for my sister for her birthday.

This crocheted wrap bracelet for St. Patty's Day!

Made this T-shirt scarf for a friend for St. Patty's Day


This is an old braided leather belt that I strung chain
through and added a finished end and a snap.
Crocheted hippie headband with a large button for added pizzaz!
Flexible metal ring with gold string wrapped for a summer wrap bracelet!

Another crocheted headband with large button.
4 different kinds of chain connected to create a staggered necklace.
Green and brown T-shirt scarf - kickin' it old school.
Part of a chain cut, leaving 2 rings with gold string wrapped for a wrap bracelet.

Green t-shirt necklace - crocheted part doubles as a headband.
Crocheted summer wrap bracelet with metal bead.
Crocheted wrap bracelet with pear-like bead for closure.

Old belt made into mens cuff with the word "possible" stamped in. Made this for a friend who shares the obsession with all things possible!

Two strips (soon to be cuffs) made from sewing scraps sewn together.
This is really cool and is made using water soluble paper! Link to come. 
This is a small bag (maybe used for cosmetics?) made by ironing old plastic shopping bags together.
The designs are pieces of yarn and small cutouts of words from magazines. I put them between the plastic bags that I ironed together. After ironing it all together I sewed a button on for closure :)

This is made of strips of magazines woven together and then taped in place using clear packing tape. I think I could use it for the cover of a notebook or as a placemat? Other ideas?? I have 3 of them.
This is a simple old industrial chain with strips of leather from my dad's shop
 woven though it. It makes a cool wrap bracelet.
Simple yellow T-shirt headband.

This is a close-up version of a T-shirt scarf. I don't love it but it is something I wanted to try to do for a while. Instead of weaving one shirt I took 2 different shirts and wove them together. I think I would like this one better if I had the lighter color on the inside. Thoughts?

This is a sampling of all of the leather belts that I have scored. Time to make more stuff from leather belts! I swear I'm not a hoarder! My mother taught me to always claim "collector." :)

Tuesday, April 10, 2012

February 20, 2012: A studly creation.


 This bad boy is a beast! It is a leather cuff made out of an old belt. I had scored a bunch of belts at Salvation Army and this was one of them. It already had the holes and the metal studs on it so it was a very simple creation (if it is even acceptable to call it a creation??). I just cut it shorter and added a belt loop that fit from another belt. This holds the flap down after you snap the cuff into place.

February 19, 2012: Lucky? -Do the math.

Being Presidents Day Weekend, my sister and I scheduled our annual getaway to Atlantic City. This year we invited our fabulous friends for our spa getaway. We stayed at the Borgata, enjoyed the spa all day, went to dinner and then... not being a gambler myself, I watched my friend play roulette. Gambling just never appealed to me and definitely never made sense to me.  You just put your money out there and have no control over what happens... yikes. My friend, on the other hand, has always been lucky. I distinctly remember going to visit her in NYC after we graduated from college. She met me in Penn Station and we went to grab a sandwich at Subway... as the man was making our sandwiches she was making small talk and announced that it was her birthday. Next thing I know we are both getting free meals. Hmmm. Now I know you must be thinking that there are "other factors" that come into play here and yes... I know. The thing is that this is a regular occurrence for her. She literally wins stuff or gets free stuff all of the time and has since we were little. So, naturally, standing at the roulette table with her was entertaining. She was confident and said to me "I am going to win like $400 and then we can leave." She basically planned on winning all of the money that it cost to be there for the weekend. I didn't even question her, I knew she would win. After pocketing $400... she called it a night.
So this experience led me to question WHY she was able to do this so easily. It's just luck right? This question bothered me. People seem to be thinking, reasoning, problem solving when around the roulette table. Perhaps they are considering laws of probability... for example... if black was hit 5x in a row, perhaps I should bet on red... because black is unlikely to hit 6x in a row. Hmmm... this reminded me of probability in genetics. When I teach genetics we work with probability. Punnett squares are used to determine the probable genetic outcomes of a mated pair's offspring. In a simple monohybrid cross, the Punnett square will show 4 genetic possibilities in the offspring. My students often have trouble understanding the difference between absolute and sequential probability (and I had a difficult time explaining it until I looked this up!!). A Punnet square shows absolute probability. So, for example each time a couple conceives they have a 50/50 chance of having a boy/girl. Check out this example (that I got from a roulette site!). So let's say you walk up to a roulette table and the number 8 has hit 4x in a row (highly unlikely). Would you bet on 8? Your answer depend on your understanding of absolute vs. sequential probability.
It turns out that the word roulette is french for "little wheel." The roulette wheel was actually introduced by French mathematician and physicist Blaise Pascal in the 17th Century as part of his search for a perpetual motion machine. (math, science, history, world languages... all in a quest to learn about roulette!)
So after much investigation, I think there are definite strategies that might make her better at winning... but luck plays a part. Regardless, understanding probability will help you avoid making bets based on incorrect thoughts about sequential probability. 
Take the roulette QUIZ.

Sunday, April 8, 2012

February 17 and 18, 2012: T-Shirt redundancy (but it never gets old!)

I don't think I will ever get bored of making T-shirt scarves. I will certainly add a little pizzaz to them and try new things as time goes on but honestly... they are so fun to make and are the perfect accessory to a comfy casual outfit :).
This one is made from two different T-shirts and I added a 4-part braid to spice it up. I should pay respect again to the blog that showed me how to make most of the T-shirt scarves that I make.


If I were you I would be wondering where the heck I get all of these T-shirts from. Well, I have gotten to the point where I do not have as many T-shirts as I once did... well at least not in T-shirt form anymore. So I like to stop at the Salvation Army and pick up large T-shirts for specific projects. One day I went in and while I was looking at the T-shirts there was a group of men feverishly ripping shirts off of hangers and throwing them into this large rolling bin. They were working quickly and I couldn't imagine what they were doing. Obviously I asked... because if you have not caught on, it bothers me to not know something that I care to know :). They told me that when clothes stuck around for more than a week they were taken off of the hangers and shipped oversees to needy communities. Huh! How cool is that? I guess they get so many donations on a daily basis that they can't take more in if they don't ship some out. I was very happy to hear that this is where they were going and that they were not being put in a dump somewhere. When I got home I went to the Salvation Army website and saw all of the great programs that they are involved in.

The next day, I took the remaining material and made a headband! :) This is just a long 4-part braid that I wrapped around 3 times and sewed together in the back. Comfy and cool... and I didn't waste the leftovers!

February 16, 2012: Inquiry Braid

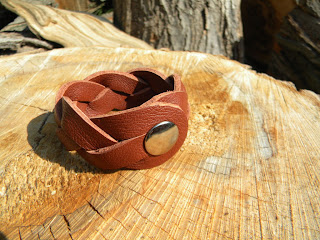
This past summer I took a bar tending course in NYC... yeah, I know. A girl's gotta have skills to fall back on right? Anyway, it turns out that the best thing I learned from that was how to make a mystery braid! My partner was a girl who was a junior at the Fashion Institute of Technology (FIT). I was asking her all kinds of annoying questions because in one of my next lives I plan on going there. She explained what her classes were like and I remember thinking how awesome it must be to be in a college program where you are creating 24/7 - awesome. So the conversation turned to her bracelet, which was a leather band that was braided but the leather was still in one piece at either end, where the snap was. So this intrigued me. I had seen them before but never really looked at one. I asked her if she knew how it was made and she said she didn't. She took it off and we both inspected it, trying to figure out how it was made. When the class startedback up she put it back on. We had not figured it out. That bothered me.

On my train ride home I searched YouTube for the answer and was pleased to find this brilliant leatherworker woman! (I think I posted her video about snap fastening earlier.)


When I got home I made several of these. It is important to make more than one of something because you get better each time. You also develop your own methods for doing things. Once you do something a few times and "know" how to do it, that is when creativity can take hold. You can try new things and make it yours.
The next week, I went back to the class and showed the FIT girl the bracelet. I took it apart and showed her how I made it. (Just watch... she will be some famous designer and her garments will be riddled with mystery braids.... ha.)
So here are two of the bracelets I made at that time:


I made the white one below out of a leather piece from one of my father's old leather sample books. The pieces are not long enough to fit around my wrist so I made a mystery braid and then added ribbon or clamp ends and a clasp. I found these "ribbon ends" at Metaliferous in NYC. The clasp itself I took off of an old necklace. :) Reuse! 
This is the one I made Feb 16th
I have since given it away to a student.

February 15, 2012: Lost my chain of thought...

Oh hey there.... yup... still alive! Everyone has been asking me, "Ms. Eberhardt.. what are your plans for Spring Break?" and all I can think about is getting back on here and catching you up on everything! Haha... So, here I am. It won't happen all at once but I will be working on it this week and hopefully catch up a bit. I have to be honest though, I kept decent records of what I made/learned but the dates may be off a little bit. Here we go!

Over the years I have collected a wide variety of metal chains. Some I bought at jewelry supply places and others are from old jewelry that I took apart. Anyway, I saw a necklace in a magazine that utilized several different types of chain and I was like... "I got this." I used jump rings to connect the small pieces of chain to the long, simple chain that goes around my neck. I like the diversity of metals and designs.
So, I always like to infuse stories about myself into biology lessons (that's true right?) whenever possible.... and it is always possible :). When we are learning about macromolecules such as proteins, we discuss the term monomer. Which is a term given to a repeating small molecule that when all linked together create a large or "macro"molecule. Amino acids are the monomers of proteins... and your body is constantly making proteins in every single cell... it's crazy! Your cells are like little protein factories! So why do we HAVE to eat proteins you ask?? Simple. Your cells need to have amino acids to make proteins. I explain this to my students by telling them how my mother and I like to buy old jewelry (and other stuff) to take it apart and make new cooler jewelry :). Your body does the same thing with proteins. We eat proteins and then your body takes those proteins apart and uses the pieces to make new cooler proteins that work for your body! Viola... successfully implanted a story about myself into a biochem lesson (hahaha).

Sunday, March 4, 2012

February 14, 2012: Hot Date for V-Day

I should start this post by telling you that I can barely begin writing because I am laughing too hard about the title. Period Ten on Valentine's day consisted of two parts. Part 1: I grabbed a red and white tie-dyed T-shirt on my way out of the door in the morning with the intention of making a Valentine's Day T-shirt scarf either before school or during lunch. Did it...Here it is:


Part 2: Hot Yoga! Bikram Yoga to be exact. My friend and I met up after work for some yoga and then sushi dinner. I have done Bikram Yoga several times before but my friend had not. It is an extremely intense workout... well an intense experience all together. First, it is a 90 minute class and takes place in a room that is 105deg F (about 40.6deg C). Clearly even sitting in a room that hot for 90 minutes is excruciating... but add in 26 different strenuous exercises... you've got a challenge! Naturally I was curious about the origin of this seemingly torturous activity. My curiosity opened a can of worms... there is so much to learn. If you are interested in the detailed story just check out Bikram Yoga Wikipedia page and then click the live links to understand the terms and connections. (Thats how I learn all kinds of things.) Here are some of the interesting things that I learned on my informational journey...
There are many kinds of yoga... and there are even a couple of different versions of hot yoga. The Sanskrit word "yoga" literally means yoke... which sort-of means to harness or attach. Sanskrit is the primary language of Hinduism and Buddhism. The goals of yoga range from attaining good health to achieving moksha... or liberation from the suffering associated with life, death and reincarnation. Woaha. A key to achieving moksha is self-realization, which can be reached through performing different kinds of yoga. (Hmmm.... perhaps more people would practice yoga if it were marketed this way?? haha IDK.) Anyway, Bikram Yoga specifically was developed by an Indian man named Bikram Choudhury. He actually started studying yoga when he was three years old and was incredibly successful in yoga competitions (who knew you could compete in yoga??) in his teenage years. His style of yoga is practiced in a hot room with exactly 26 physical poses and breathing exercises. The theory behind the breathing exercises is that they increase lung capacity and therefore oxygen absorption. The physical poses are meant to be strenuous and compress certain areas of the body, cutting them off from blood flow. This, supposedly, causes the heart to pump faster in an effort to supply those areas with blood. When you release from the pose the fresh, oxygenated blood rushes into the deprived area. 
I have to say, when I leave Bikram Yoga I do feel awesome. I have heard some views though that it is dangerous and the heat in the room can invite overextension of muscles and joints, which could be detrimental. I can totally see how this would be addicting, however, because it really does feel refreshing when you are done. I am intrigued by Buddhism and the goals of overall physical and mental health and clarity. 

February 13, 2012: Totally Tubular

Clearly I am getting a little bit behind in updating... I have to look at my list on my phone to remember what I created on the date that I am writing about... Yikes! I have to get this caught up.
On this day, Monday February 13th, I went to training at TSK which was, as it always is, very refreshing. While I was waiting for class to start I was in a Starbucks working on Period Ten. It was then that I realized Period Ten was about to get 1000 views! I thought this was pretty exciting, so thanks for stopping by everyone :).
When I returned home from training at about 10PM, I put some finishing touches on a piece that I had started earlier in the week. Now, I have to say that this is not a test tube! Which, one might assume that I stole from the lab at school... haha. I didn't! This does lead me to the fact that this is a glass cigar tube. I do not smoke cigars! There are all kinds of fun cigar packaging things out there at rummage sales though. Cigar boxes and tubes make great crafting supplies. (So... are we clear? -- I did not steal a test tube... and I do not smoke cigars! haha)
As you can see the tube is filled with colorful seed beads that I have collected over the years. I poured some Ice Resin into the tube and moved it around until the resin covered the sides of the tube. Then I poured the beads in and rolled it around until the beads were stuck all over the sides of the tube. I had to let it sit for a day until the resin hardened. Then I repeated, and repeated, etc. I envision this to be a fun little vase that I hang in the window in the summer with fresh cut flowers. I still have to figure out how to hang it though... TBA.
To learn more about how the resin works, click the label below to jump to previous posts. The new information that I learned is that the term resin is actually referring to organic molecules (hydrocarbons, specifically) produced by plants! I'm not sure that it can get more biology related! As I read through the Wikipedia page, I became more and more fascinated by things you could learn by just being interested in using resin to make stuff! For example, did you know that frankincense and myrrh are resins? There is an incredible amount of history in those two examples. I was particularly interested in the fact that resins are used to make incense and perfume. Obviously there is a ton of organic chemistry going on here too.... without even looking for it.

Sunday, February 26, 2012

February 12, 2012: Get off MY Soapbox!


Haha! As I was thinking of a title for this post (which is about a very literal soap box)... I questioned "where did the saying 'get off your soapbox' come from?" Well my friends, since I find myself on my own "soapbox" more than I would like to admit... I feel obligated to share the origin of this saying. To avoid plagiarizing Wikipedia just check out the page on the soapbox.
So, people would literally elevate themselves on a box used for shipping soap... huh. My favorite part is that the modern form of a soapbox is a blog. Hmmm...
Well, I built a soap box! Earlier posts explained how I learned to make soap and showed off my first batch. However, during that process I had to use a tupperware container for my soap mold... that was less than ideal. I decided to make my own soap mold that had the dimensions I was looking for as well as clean edges.
To make this box I used some fun power tools...(Thanks Dad!). The box is made out of cherry- check out info about this and other types of wood. To cut the pieces, I used a chop saw (check it out below!). The very thin piece of wood that covers the bottom of the box was cut using a band saw. I put the pieces together using a nail gun. 
Bad A$$ :)


February 11, 2012: What's Cookin' at Peters Valley?

If I could choose to teach something other than biology it would be.... ART :) (actually it would be cool to teach an alternative Phys Ed class... like kickboxing, Jiu Jitsu or Yoga or something too). Anyway, my secret desire to teach, well... everything... leads me to wonder around the building incessantly looking for cool stuff that's going on (and trust me there is quite a bit when you look for it!). Point is, during one of my escapades, I became aware that the ceramics teachers and students go to Peters Valley Craft Center twice a year. This is very exciting news because I basically grew up at Peters Valley, because my mom was the director there for many years. I have always wanted to visit the RHS group while they were there but for whatever reason... I had not gotten the chance... until today! 
The RHS group had worked for months making pieces to fire in the wood fire kiln at PV. The process of firing the kiln is very labor intensive. But, I will say that the RHS team was so good that they were actually finished by the time I got there! They had been stoking the kiln around the clock, taking shifts during the day and over night to get the kiln to a certain temperature and then maintain that temperature. The temperature of the firing is crucial to the success of the firing. As I am writing this I am trying to look for more information to share with you about the actual process. While I thought I learned quite a bit... I am realizing that it is not enough. (I am going to talk to the ceramics teacher and the students to gather some more information and then edit... so stay tuned!)
But I would like to share that the ceramics teacher and I did bounce around some cross-curricular ideas such as:
Science: 1) the firing temperature and the reaction of glazes, etc 2) the clay itself - origin/composition/ geology/mineralogy/etc
Social Studies: 1) the history of wood fire (Asian roots of wood fire ceramics), 2) historical significance of clay 3) the history of Peter's Valley and the Tock's Island Dam Project - eminent domain, etc. 
The list is still growing but there is quite a bit of potential here!
Peters Valley is also home to an Anagama kiln, which is a Japanese word meaning "cave kiln." The Anagama is a long kiln that is built into the side of a hill at PV. It is fired once or twice a year and is a huge production. I remember being little and throwing a piece on the kick-wheel just to put in the Anagama. Then, when it was time to load the kiln I would get to walk in the kiln and up the steps to put my piece inside. It was exciting. The placement of the pieces in the Anagama effects how the piece will look after being fired. This is because the flame will take different paths depending on the placement of the pieces. The fire is stoked at the bottom of the kiln and there is a flue at the other end, causing the flames and smoke to take a path upward through the kiln, passing over the pieces of pottery. This causes an unpredictable pattern and sometimes color to appear on the pieces... which is why it is so exciting to take the pieces out after it cools down! The Anagama is stoked 24 hours a day for several days before firing is finished. Everyone anxiously awaits the opening. 
What the RHS group did is similar to the firing of the Anagama but I would love to get more detail from them about their process and maybe share some pictures of their work. Meanwhile... perhaps I will share this picture of me on a swing when I visited the RHS group at PV.

Tuesday, February 21, 2012

February 10, 2012: Round and round we go!

Simple? Yes. I saw a similar necklace on Pintrest one day and I immediately added it to my list of things to make. Luckily I had this old chain that I got at Metalliferous for $2.00 a couple of years ago. The chain has several different sized rings and they are made of some strange flimsy metal... perfect for this project. I used wire cutters to cut 4 different-sized rings off of the chain, then I secured them to the chain with a jump ring. The rings are light and they fit together nicely in the jump ring. I wish I had more to say about this one :)... It is a very easy project if you have some old jewelry findings lying around.