Showing posts with label T-shirt Scarf. Show all posts

Monday, April 23, 2012

March and April... Shake and Make

Hey all... alive here...

So I've decided to do 3 posts that get me caught up. At this point I either get back up to date or stress myself out about making detailed posts about every single thing I have done in March and April (not going to happen...). To be honest, this has been a fantastic lesson in itself. I think I will feel really good about just getting caught up and back on track. I apologize for the lack of detail and when I get a chance I will come back and elaborate. In the meantime, if you have questions about what something is or how I made it or what links are... please comment and I will let you know. Here we go!

In this post I am just going to upload pictures of things that I have made over the last two months (honestly I do not remember the exact dates.) Also... there are more so I will continue to add pictures. Some things I gave away so I will have to find a way to get pics. Thanks for your patience! 

Photo I took at my sister's house. Edited with Instagram iPhone app.  
Made this crocheted wrap bracelet for my sister for her birthday.

This crocheted wrap bracelet for St. Patty's Day!

Made this T-shirt scarf for a friend for St. Patty's Day


This is an old braided leather belt that I strung chain
through and added a finished end and a snap.
Crocheted hippie headband with a large button for added pizzaz!
Flexible metal ring with gold string wrapped for a summer wrap bracelet!

Another crocheted headband with large button.
4 different kinds of chain connected to create a staggered necklace.
Green and brown T-shirt scarf - kickin' it old school.
Part of a chain cut, leaving 2 rings with gold string wrapped for a wrap bracelet.

Green t-shirt necklace - crocheted part doubles as a headband.
Crocheted summer wrap bracelet with metal bead.
Crocheted wrap bracelet with pear-like bead for closure.

Old belt made into mens cuff with the word "possible" stamped in. Made this for a friend who shares the obsession with all things possible!

Two strips (soon to be cuffs) made from sewing scraps sewn together.
This is really cool and is made using water soluble paper! Link to come. 
This is a small bag (maybe used for cosmetics?) made by ironing old plastic shopping bags together.
The designs are pieces of yarn and small cutouts of words from magazines. I put them between the plastic bags that I ironed together. After ironing it all together I sewed a button on for closure :)

This is made of strips of magazines woven together and then taped in place using clear packing tape. I think I could use it for the cover of a notebook or as a placemat? Other ideas?? I have 3 of them.
This is a simple old industrial chain with strips of leather from my dad's shop
 woven though it. It makes a cool wrap bracelet.
Simple yellow T-shirt headband.

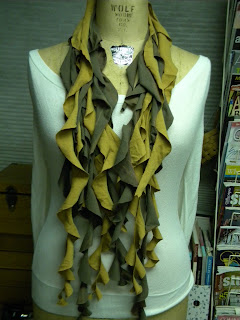
This is a close-up version of a T-shirt scarf. I don't love it but it is something I wanted to try to do for a while. Instead of weaving one shirt I took 2 different shirts and wove them together. I think I would like this one better if I had the lighter color on the inside. Thoughts?

This is a sampling of all of the leather belts that I have scored. Time to make more stuff from leather belts! I swear I'm not a hoarder! My mother taught me to always claim "collector." :)

Sunday, April 8, 2012

February 17 and 18, 2012: T-Shirt redundancy (but it never gets old!)

I don't think I will ever get bored of making T-shirt scarves. I will certainly add a little pizzaz to them and try new things as time goes on but honestly... they are so fun to make and are the perfect accessory to a comfy casual outfit :).
This one is made from two different T-shirts and I added a 4-part braid to spice it up. I should pay respect again to the blog that showed me how to make most of the T-shirt scarves that I make.


If I were you I would be wondering where the heck I get all of these T-shirts from. Well, I have gotten to the point where I do not have as many T-shirts as I once did... well at least not in T-shirt form anymore. So I like to stop at the Salvation Army and pick up large T-shirts for specific projects. One day I went in and while I was looking at the T-shirts there was a group of men feverishly ripping shirts off of hangers and throwing them into this large rolling bin. They were working quickly and I couldn't imagine what they were doing. Obviously I asked... because if you have not caught on, it bothers me to not know something that I care to know :). They told me that when clothes stuck around for more than a week they were taken off of the hangers and shipped oversees to needy communities. Huh! How cool is that? I guess they get so many donations on a daily basis that they can't take more in if they don't ship some out. I was very happy to hear that this is where they were going and that they were not being put in a dump somewhere. When I got home I went to the Salvation Army website and saw all of the great programs that they are involved in.

The next day, I took the remaining material and made a headband! :) This is just a long 4-part braid that I wrapped around 3 times and sewed together in the back. Comfy and cool... and I didn't waste the leftovers!

Sunday, February 12, 2012

February 5, 2012: Super Bowl OF CHILI!

Ahhh Happy Super Bowl! I thought it would be appropriate if I made a Giants scarf for my Super Bowl fiesta that I was attending. I ended up leaving it with my dear friend, the hostess, after the exhilarating victory (which is fine because I am actually a Jets fan... but happy to see Giants win tonight) Check it out:


My true creation of the day however was a monster pot of chili! You may not know that I love to cook. Cooking is, after all, an art (one of my students said that the other day and she is super smart, funny and creative so I know this is true!). Today my creation was my own chili recipe! I cooked up a huge pot for a Super Bowl party. Disclaimer: This is Paula Dean-on-steroids chili... not for the clean eater. If you are aiming to please with taste, this is the way to go. Yum. Second disclaimer: I do not usually follow recipes... actually I really never follow recipes... hmmm. Furthermore, I am not sure exactly how much I used of each ingredient... but it worked! Have fun and experiment... that's what its all about.

Sorry, I forgot to take a pic before the partaaay...
You get leftovers! :)
Ingredients:

  • applewood smoked bacon chopped
  • italian sausage
  • ground beef
  • chick peas
  • yellow onion chopped
  • green pepper chopped
  • red pepper chopped
  • yellow pepper chopped
  • minced garlic
  • tomato paste
  • fresh salsa
  • mild salsa (Tostitos)
  • Tobasco sauce 
  • chili powder
  • salt 
  • pepper

Instructions:

  1. First, chop up the bacon and put it in a large frying pan on medium heat.
  2. When the bacon is pretty crispy and there are lots of tasty fats in the bottom of the pan, put in your chopped onion, peppers and minced garlic. 
  3. Cook on medium heat until the onions and peppers are caramelized.
  4. Mix the fresh salsa into the onion, pepper, bacon mixture and let sit on low heat.
  5. In a large pot, add the Italian sausage and ground beef. Cook on medium heat until the meat is cooked through. Mix periodically while cooking.
  6. When the meat is cooked, add the onion, pepper, bacon mixture from the pan to the meat and mix thoroughly.
  7. Add the tomato paste, medium salsa, tobacco sauce and salt and pepper and mix.
  8. Add the chick peas and mix.
  9. Let simmer on medium-low heat until ready to serve.
  10. Optional: You can add some chili flavoring if you want a stronger flavor. 
I know it seems a little scary, my approach to cooking, but it always works out in the end and tastes amazing! Now I just have to actually make notations about what (and how much) is going into the dish. OK fine!

Sunday, January 22, 2012

January 19, 2012: The cutting edge


Yes! T-Shrits again! More to come too... ahhhahhhahhhaa. Many people are going crazy for this one. The good news is that it is easy breezy so you can whip this one up in a matter of minutes. All you need is:

  • 2 large T-shirts (a cool color combination)
  • Something circular (10-12in... or 25-30cm in diameter - a dinner plate would work)
  • A pencil to trace the circles
  • scissors
That is all! I'll do my best to explain...

  1. Start by spreading the T-shirts out on a table, front side down- smooth any wrinkles.
  2. Use the plate to trace 4 circles on the back of each shirt, if you can fit that many (try not to trace over a collar or hem... or major designs... if you don't want them to be part of your scarf)
  3. Cut each of the circles out (cut through both sides of the shirt, giving you 2 circles for each cut)
  4. If you did 4 cut-outs for each shirt you should end up with 16 total circles. 
  5. Pile the circles from the same shirt on top of each other (2 piles, one from each shirt)
  6. Cut the circle in a spiral - do this for each T-shirt pile of circles
  7. Separate the strands from each other and arrange them in a pleasing way. 
Just like the other T-shirt scarf, I will probably post my own tutorial video... but in the meantime... here is the site that I used to learn. Happy Re-Teeing!

January 18, 2012: Tearin' it up!

This is one of my favs! I always like doing different things with old T-shirts... and I guess that stems back to when my friends and I were in high school and we would go to thrift stores on a regular basis looking for the most beat-up and funky T-shirts we could find. As a result... I have a plethora of Ts. That, of course, does not stop me from buying more. Bag sales! Why not, when you can up-cycle to amazing accessories such as these?

How did I make it... hmmm. This one just might need a video or picture tutorial because it would be hard to explain in writing. I posted it to my Pintrest board for my creations and it is spreading like wildfire...So stay tuned, I will definitely follow up with a tutorial. Until then... just cut up those shirts and yank on the pieces, braid them and twist them until you have something fabulous!

Monday, January 16, 2012

January 8, 2012: Tired to Tie Dye

One of my favorite creative pastimes is making t-shirt scarves. They are ridiculously simple and always result in a fun, versatile accessory! So, on this Sunday evening, post blog-updating and school-week-prep, I found myself incredibly exhausted... yet committed to continuing my daily creations. I had just purchased two old tie dye T-shirts from the Salvation Army so I decided to whip up a scarf. To make this scarf/necklace, start by cutting the T-shirt straight across from armpit to armpit. Next, cut off the bottom hem of the shirt. This should leave you with a rectangular piece of T-shirt. The piece should be in one connected loop. Cut strips (about 1 inch wide) from side to side. When you have all of your strips, pick them up individually and pull them so that the T-shirt material curls up and forms a noodle-like shape. Each strip should now be curled up. Put them together and you have your noodle scarf! Many more variations to come! Check out this great tutorial I found! : http://madethislovethis.com/made/tshirtscarf/