Showing posts with label upcycle. Show all posts

Saturday, February 11, 2012

January 30, 2012: Tear-able T!

When in doubt, rip up a T-shirt!

I was soooo tired on this Monday night but knew I had to do something. Luckily I have this awesome book on hand by Megan Nicolay about transforming T-shirts! Check out Generation T. Also, here is the first video that I saw on Threadbanger Channel onYouTube that caused me to buy her book:


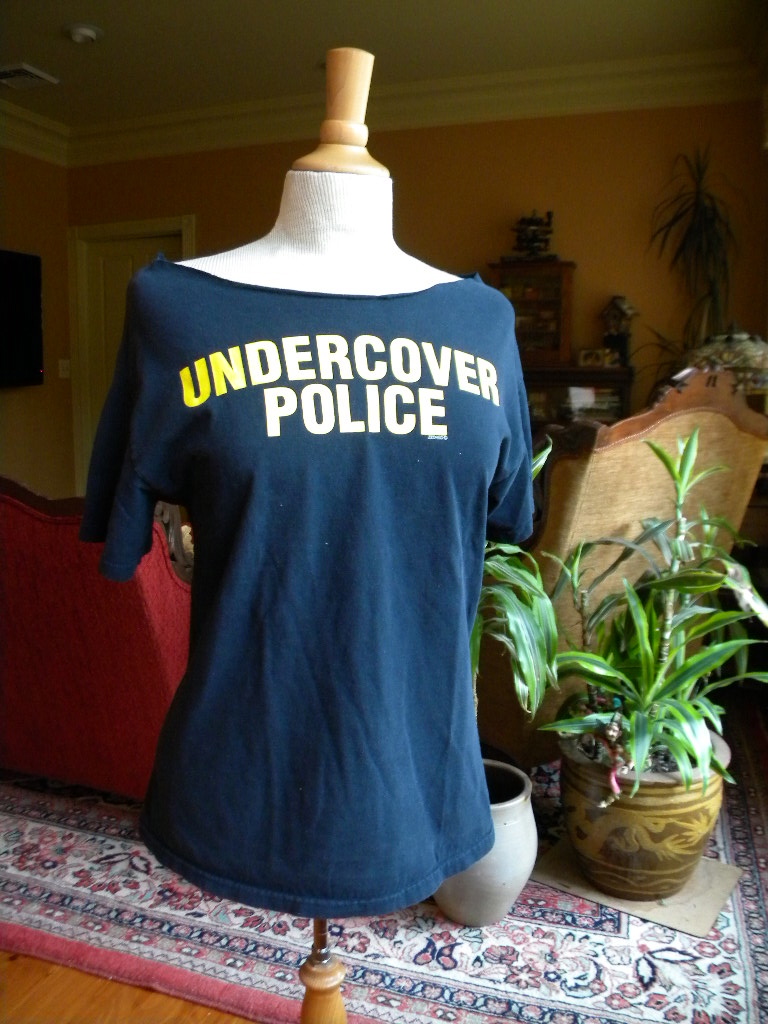
She's cool right? Check out her website for cool crafting ideas and to buy her books if you are interested. From her many ideas, I chose "Back in Action" for this Monday night project. I had a cool navy colored T-shrit that I got at a rummage sale somewhere along the line. I love the fact that it announces "Undercover Police" on the front... fabulous! Even though I find it incredibly cool, I have so many T-shirts that I never get around to wearing it. So I decided to make it into something... more than a T!

Here it is:

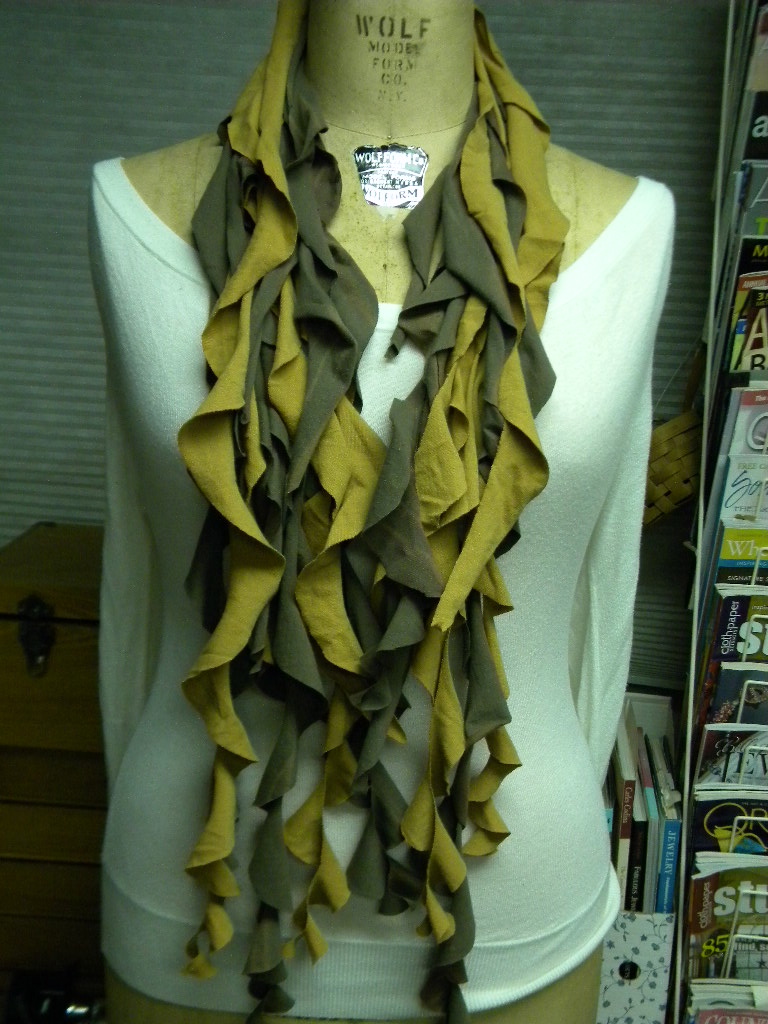
Basically I cut the collar out to create a wide neckline. Then I cut the back of the shirt into strips. Then I "laddered" the strips. Laddering is kinda hard to explain in writing... but here's a video that I found that can explain it... (PS... I think it is hysterical and awesome that many instructional videos on YouTube are actually done by... yup... high school-aged kids... again - we need education reform NOW... to have an educational system that actually recognizes and capitalizes on the world that these kids are living in - conclude rant...) Here's the link to the video.


Sunday, February 5, 2012

January 22, 2012: A tail of leather

First, let me apologize for the late posting! Where have two weeks gone!? Honestly... these two weeks have been quite a test of my ability to pull this off. Between a birthday, grading and going quite a bit above and beyond what I owe my district (but I am truly happy to do it!!).... I have had to scrounge time to create much less actually update Period Ten. But here I am :) and I am hoping to see the Giants win the Super Bowl later so let's do this....


So, as I have mentioned before, I really enjoy using the beat up leather from old belts. It just has at the look and feel that you can not get from new leather that you might order new. This leather is actually from the same belt that my "wrap-it-up" bracelets were made from... and there's still plenty to go! This braid looks similar to a fishtail braid that I use in my hair (how to tutorial). Previously, I did not know how to get this look with other material (than hair). I found this tutorial on... what else?... Pinterest. It shows you how to do this with paracord, which is used by the military, firefighters, law enforcement, etc. I will follow up with a story about a student who taught me all about paracord at a later date (when I make a paracord creation!). I chose to use the leather strips that I love so much :) 
The closure for this bracelet was the most difficult part. I ended up using a vintage clip-on earring finding as a hook. Check out the close-up photo.

Sunday, January 22, 2012

January 20, 2012: Possible... what a word!

"Be kind whenever possible. It is always possible.Dalai Lama

To make this ring I used many of the techniques I have explained in past posts (check-em!) The ring itself is made of nickel-silver and I hammered and bent it using a ring mandrel and soldered it closed. Then I soldered an old watch setting to the ring. Next I painted the inside of the setting with ModPodge to seal off any cracks or crevices. Next, I put in the word "possible" that I cut out of an old dictionary. I think this might be my favorite word in the English language. If you take a second to consider it's meaning... it is inspiring. Really.. it applies to anyone's life... and anything you want to do. Most things are possible if making it happen is a priority to you. :)

Well, once my favorite word was adequately ModPodged into this watch setting, I covered it with resin.... several coatings. The reality is that I did this over the course of several days and only finished it on Friday 1/20/12. So here it is :) Enjoy the possibilities friends!


January 19, 2012: The cutting edge


Yes! T-Shrits again! More to come too... ahhhahhhahhhaa. Many people are going crazy for this one. The good news is that it is easy breezy so you can whip this one up in a matter of minutes. All you need is:

  • 2 large T-shirts (a cool color combination)
  • Something circular (10-12in... or 25-30cm in diameter - a dinner plate would work)
  • A pencil to trace the circles
  • scissors
That is all! I'll do my best to explain...

  1. Start by spreading the T-shirts out on a table, front side down- smooth any wrinkles.
  2. Use the plate to trace 4 circles on the back of each shirt, if you can fit that many (try not to trace over a collar or hem... or major designs... if you don't want them to be part of your scarf)
  3. Cut each of the circles out (cut through both sides of the shirt, giving you 2 circles for each cut)
  4. If you did 4 cut-outs for each shirt you should end up with 16 total circles. 
  5. Pile the circles from the same shirt on top of each other (2 piles, one from each shirt)
  6. Cut the circle in a spiral - do this for each T-shirt pile of circles
  7. Separate the strands from each other and arrange them in a pleasing way. 
Just like the other T-shirt scarf, I will probably post my own tutorial video... but in the meantime... here is the site that I used to learn. Happy Re-Teeing!

January 18, 2012: Tearin' it up!

This is one of my favs! I always like doing different things with old T-shirts... and I guess that stems back to when my friends and I were in high school and we would go to thrift stores on a regular basis looking for the most beat-up and funky T-shirts we could find. As a result... I have a plethora of Ts. That, of course, does not stop me from buying more. Bag sales! Why not, when you can up-cycle to amazing accessories such as these?

How did I make it... hmmm. This one just might need a video or picture tutorial because it would be hard to explain in writing. I posted it to my Pintrest board for my creations and it is spreading like wildfire...So stay tuned, I will definitely follow up with a tutorial. Until then... just cut up those shirts and yank on the pieces, braid them and twist them until you have something fabulous!

January 16, 2012: A spoonful of time

While in visiting Milford PA a couple of weeks ago to get my tattoo, I discovered a cool little gift shop that had handcrafted jewelry on consignment. (WAIT WHAT... TATTOO!? Yes. Perhaps I will share more later.) On display were a bunch of rings and necklaces made out of old spoons. I had never seen this... but both my friend Jenny and my mom said that they had seen them before. Even though it seemed that this up-cycling of flatware was old news... I thought it was a fantastic idea. Why not capitalize on the very inexpensive excess metal?


I started this pendant by hammering an old spoon until it was flat. Then I filed, sanded and buffed it until it had the desired look and feel. Next I placed the watch piece on the surface of to see where I wanted to solder it on. I marked where it was going to go and then punched the word "flies" into the metal using a metal punch set that was picked up at a rummage sale. I tried a new technique, sweat soldering, to attach the watch piece to the spoon piece. It worked! Although, I imagine I will try something else in the future because the watch insides do not seem too fond of the heat... smokey... yikes! Perhaps some sort of cold connection? We'll see.
Then it was time to buff it up to the desired look. Again, as usual, I like the worn and beat up look so I did not shine it up too much. Once it had the look, I put a hole in the pendant so that I could connect the jump ring and put it on a chain. To make this hole I used a metal hole punch screw. Before attaching it to a chain I wanted to make the letters stand out more. To accomplish this, I had to oxidize the metal using an oxidizing agent.  Oxidation (zing! science is everywhere!) happens as a result of a redox reaction (reduction/oxidation) where one substance is reduced (picks up electrons) and the other is oxidized (loses electrons). In this case, the metal is oxidized using a using liver of sulfur . This made the letters darker and less shiny, causing them to stand out and be easier to read. To finish up, I put a jump ring through the hole and then put it on a silver chain that I had from years ago.

I tried to put links to everything that I used so you can find what you need easier if you want to make something like this. Have fun!

Monday, January 16, 2012

January 10, 2012: T-riffic Wall Decor

This was one of those nights when I felt awful. I wanted to make something new but I really could not spend too much time on it. Thinking back to a recent conversation with a friend, (Beth maybe... was it you?) I was inspired by the idea to use embroidery hoops to turn old fabric into interesting works of art for your wall. A simple internet search lead me to this pintrest site with all kinds of cool ideas! You can find and abundance of embroidery hoops in thrift stores where they sell for about 10 cents - 25 cents a piece.  Needless to say, my project for this night in particular is less than stellar... but I got something done and opened a can of worms for future projects! This one is the back of a 2010 World Cup T-shrit. The front of the shirt was an advertisement for Guinness, which I do enjoy but I never wore the shirt. I cut out the soccer ball and put it on the embroidery hoop. Viola! Not overly involved but it does look pretty cool. Perhaps I will add to it later.

January 9, 2012: Nothing to Waste!

Having long hair all of my life... (well... that is, since I was old enough to make my own decisions about my hair...) I have had an interest in cool ways to wear my hair and fun things to put in my hair. I had some tie dye T-shirt material left over from the scarf from Sunday so I decided to make some headbands. (Nothing to waste! It is always a good idea to keep your scraps! I will show you something fun to do with your scraps in a future post.)  For each headband I used 4 (about) 20 inch T-shirt strands. Specifically, I used 2 brown and 2 tie dye strands for each. The first one is a 4-part round braid (this is the video that I originally learned this braid from... it is with leather but the technique can be used with your hair, T-shirt material, leather, or whatever! http://youtu.be/0afO40tsqAc ) The second one is also a 4-part braid but flat. This braid can be done a couple of ways. The way this one is made is by taking the strand on the left and going (to the right) over, under, over. Then a new strand is on the left... take that one and do the same: over, under, over. Repeat. There are tons of tutorials out there on different kinds of braids so just get the gist of it and then be creative!

January 8, 2012: Tired to Tie Dye

One of my favorite creative pastimes is making t-shirt scarves. They are ridiculously simple and always result in a fun, versatile accessory! So, on this Sunday evening, post blog-updating and school-week-prep, I found myself incredibly exhausted... yet committed to continuing my daily creations. I had just purchased two old tie dye T-shirts from the Salvation Army so I decided to whip up a scarf. To make this scarf/necklace, start by cutting the T-shirt straight across from armpit to armpit. Next, cut off the bottom hem of the shirt. This should leave you with a rectangular piece of T-shirt. The piece should be in one connected loop. Cut strips (about 1 inch wide) from side to side. When you have all of your strips, pick them up individually and pull them so that the T-shirt material curls up and forms a noodle-like shape. Each strip should now be curled up. Put them together and you have your noodle scarf! Many more variations to come! Check out this great tutorial I found! : http://madethislovethis.com/made/tshirtscarf/

Sunday, January 8, 2012

January 6, 2012: Suzie Homemaker Hair Tie

This past June I went to Atlantic City to the Dave Matthews Caravan. It was a three-day music festival featuring many of my favorite bands... thrilling... a great way to start my summer. While I was there I bought a cool headband that was made in Indonesia. There was a deal where you could buy three for twenty dollars but I only bought one. Why? Well, because I looked at it and thought.. I can definitely make these. It was not until Friday after returning home from Ski Club that I actually put my sewing machine where my mouth was. 

This headband is made out of an old plaid, button-down shirt and some elastic. It is called the Suzie Homemaker Hair Tie because I made it for my sister. She loves plaid, country-looking things and she has great hair... and a lot of it! She has two little, very energetic boys and is always busy being the best mom ever. Now she can do that with her hair held back in a country-chic homemaker hair tie!

January 5, 2012: Wrap it up!

One of my favorite jewelry trends is the wrap bracelet. And, as I have mentioned before, I have been collecting old leather belts from thrift stores and rummage sales. Also, this is a great time to mention that I am a huge fan of upcycling, so you will see much more of old things becoming new things!...For this brown, leather creation, I took apart one of those braided leather belts and stretched and hammered the strands until they were somewhat straight and softened (not too straight though because I like the worn, rugged look of them). As you can see, I made two separate bracelets; one is braided with chain and the other contains two plain strands. I used little clamp ends that you basically just hammer closed on the ends of the leather. then I attached magnetic fasteners, which are fabulous! A frustrating thing about wrap bracelets is that they can be a pain to close... not these ones! I found these clamp ends and closures at a Bead World on Broadway (around 37th street) in NYC. My favorite thing about these are the fact that you could wear them separately or you can use the opposite magnetic ends and make one large wrap bracelet or even a funky necklace (with the braided chain one hanging in front and the plain one behind your neck). Cool look :)