Showing posts with label bracelet. Show all posts

Saturday, February 11, 2012

February 2, 2012: Keepin' Tabs


This one is cool because I picked it up from kids at school. I think the National Art Honors Society has been making them and selling them for fundraising. (Not sure about that one... but I did hear that from a student and I have seen these around on multiple occasions - in and out of school.) I was having a difficult time thinking of something to make today and realized that I had wanted to try this. I had a coffee can full of tabs so that was that. I do, however, have a knack for making things slightly more difficult than they need to be... and here's how I did it this time. I was not fond of the shiny silver look of the tabs so I decided I would try to oxidize them a little using liver of sulfur (technique discussed in January 16 creation). Well... I put about 30 tabs into a small amount of the oxidizing agent and it got interesting. It started making this metallic looking solution and started bubbling! I thought I was going to blow something up. Ugh. I let them sit in there a while, during which time I frantically looked up what could be happening in there. I was concerned that because the tabs were aluminum and not silver... that something crazy could be going on. I could not find anything that suggested it should create a violent reaction so I got over it. The only thing I found was that the effect would not be as noticeable on aluminum as on silver. I rinsed them off and then took some fuchsia satin cord. (The reason that fuchsia is in bold italics is because I had to look up the spelling... because it is down right bizarre! Upon doing so, I learned that this color got its name from a genus of flowering plants... that obviously have bright pink/red/purple flowers. AND did you know that fuchsia is a synonym for magenta? Huhh... the things you can learn on the web!)
Back to the bracelet... Being completely honest, I did not use a tutorial for this because I found it pretty easy to figure out on my own. Buuut... since I am not doing tutorials yet... I searched and found the this was probably the best of the video tutorials on YouTube. Happy tabbing!

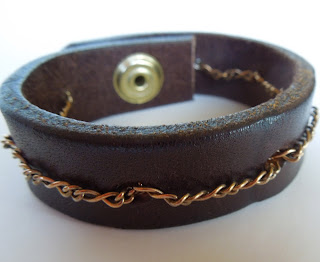
February 1, 2012: Cuffed

Last summer I made a cuff out of an old belt and wove chain through the belt holes. I got tons of compliments on it. Basically... the story is that I made another one today :). I have developed an obsession of sorts, with old leather belts. I literally stalk thrift stores for vintage leather belts... but generally will settle for any leather belt that has the slightest sign of being worn before. Haha. I really need to get to making more of these. Super simple - cut the belt to the size that you need (easily measurable by wrapping it around your wrist and overlapping it about 1in to account for the snap). Then, take a piece of chain (could be purchased at a craft store, jewelry supply store, or even just taken from an old piece of jewelry that you don't wear anymore) and weave the chain in and out of the holes. Once you get to the last hole, go back through the holes the opposite way (so there are no gaps between chain sections). When you get back to the beginning, secure the two ends of the chain with a jump ring (preferably the same metal/color as your chain). Side note: if you want to make more cuffs out of the same belt and need to make more holes, get a leather hole-punch tool or set
When you are done, you will need to set a snap fastener. You can buy snaps at a craft store like A.C. Moore or Michaels and the snap set usually comes with tools for setting. Some people would recommend using a more professional tool for better setting but if you are only beginning and do not know how much snap setting is in your future, I would recommend just going with the tools that come in the kit for now. This guy does a pretty good job demonstrating how to use set snaps this way. If you decide to go big-time, this lady will let you know how! :) Have fun!

January 31, 2012: Winging It

For this bracelet I used soldering techniques that I have described in past posts. The wing piece is sterling silver and the base is copper. Both pieces are from a box of someone's old jewelry-projects-went-wrong. I think my mom picked this box up at a rummage sale or something because it had metal findings :).
The truth is, I started this bracelet in December sometime but didn't finish it until today. Originally I had it on a piece of hemp cord and tied a knot to close it around my wrist. Well, that was not working out. I did not have the copper piece bent correctly so it was tipping forward and the wing was digging into my wrist... awesome - not to mention that it was a huge pain in the butt to put on and take off.
Which brings me to today :) I decided to use one of my new favorites, a magnetic clasp! They truly are the best clasps for bracelets because you do not have to awkwardly contort your wrist and fingers to close it... it just closes itself nicely. I folded a coper chain three times to make it a little bulkier and more secure. I actually really like it now. Yay!

Sunday, February 5, 2012

January 22, 2012: A tail of leather

First, let me apologize for the late posting! Where have two weeks gone!? Honestly... these two weeks have been quite a test of my ability to pull this off. Between a birthday, grading and going quite a bit above and beyond what I owe my district (but I am truly happy to do it!!).... I have had to scrounge time to create much less actually update Period Ten. But here I am :) and I am hoping to see the Giants win the Super Bowl later so let's do this....


So, as I have mentioned before, I really enjoy using the beat up leather from old belts. It just has at the look and feel that you can not get from new leather that you might order new. This leather is actually from the same belt that my "wrap-it-up" bracelets were made from... and there's still plenty to go! This braid looks similar to a fishtail braid that I use in my hair (how to tutorial). Previously, I did not know how to get this look with other material (than hair). I found this tutorial on... what else?... Pinterest. It shows you how to do this with paracord, which is used by the military, firefighters, law enforcement, etc. I will follow up with a story about a student who taught me all about paracord at a later date (when I make a paracord creation!). I chose to use the leather strips that I love so much :) 
The closure for this bracelet was the most difficult part. I ended up using a vintage clip-on earring finding as a hook. Check out the close-up photo.

Tuesday, January 3, 2012

January 2, 2012: Leather Cuff


I have always admired cool leather cuff bracelets. After scouting Etsy and some funky street markets in NYC I started buying used leather belts at thrift stores and rummage sales. Now I have a beastly collection! This past summer I played around with making a couple of cuffs. My father works with tons of leather for work and also has a snap fastener and hole punchers, etc. Naturally, having tools available made my dreams of creating leather cuffs more realistic. So the crafting began :). However, I had seen all types of bracelets that had different types of fabric, metal, other leather pieces, etc. attached to the leather cuff with metal fasteners. Well, this 2012 endevor inspired me to see what I could do. I learned the difference between rivets, grommets and eyelets. Not an easy task! Rivets are solid on top and are used to fasten two pieces of fabric together. Grommets (larger) and eyelets (smaller) have holes in them, creating a reinforced hole in the fabric. Anyway... I found rivets at A.C. Moore and used them to stick two pieces of leather (from repurposed leather belts) together. I stamped the word "live." in the top piece. Check it out!