This is a funny one :). You might imagine that creating/making/learning something everyday can be time consuming. As a result, my room and laundry and life, if you will... were getting a little out of control! So I had to clean up and organize. Saturday was a GYST day, as I like to call them (Get Your Shit Together). Since I had to do it, I decided to infuse my creative endeavor into the "gotta do." Earlier in the day I was on (my new faaaaaaavorite site...) Pintrest and I saw a creative use of fabric scraps that I loved.
I was inspired by this to make a scrappy bed skirt. This was the outcome :). Very rough and makeshift at this point, but I will follow up by sewing it together and making it into a finished product. Just remember, even the "gotta do" can be creative too!
What do you do Period Ten? Period Ten is where learning is personal and you have the freedom and time to explore new ideas and pursue mastery in a skill or content area. This idea was born out of my passion for education and my belief in the importance of relevant and meaningful learning and creating. During "Period Ten," everyday in 2012, I am going to create and/or learn something new. Each week I will share my progress. To learn more, please visit the Period Ten page link. Enjoy!
Sunday, January 22, 2012
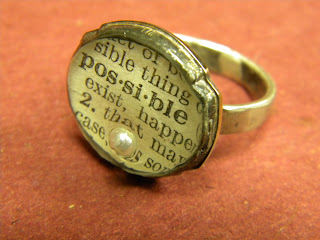
January 20, 2012: Possible... what a word!
"Be kind whenever possible. It is always possible." - Dalai Lama
To make this ring I used many of the techniques I have explained in past posts (check-em!) The ring itself is made of nickel-silver and I hammered and bent it using a ring mandrel and soldered it closed. Then I soldered an old watch setting to the ring. Next I painted the inside of the setting with ModPodge to seal off any cracks or crevices. Next, I put in the word "possible" that I cut out of an old dictionary. I think this might be my favorite word in the English language. If you take a second to consider it's meaning... it is inspiring. Really.. it applies to anyone's life... and anything you want to do. Most things are possible if making it happen is a priority to you. :)
Well, once my favorite word was adequately ModPodged into this watch setting, I covered it with resin.... several coatings. The reality is that I did this over the course of several days and only finished it on Friday 1/20/12. So here it is :) Enjoy the possibilities friends!
January 19, 2012: The cutting edge
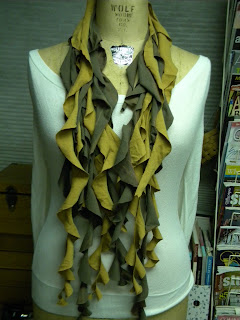
Yes! T-Shrits again! More to come too... ahhhahhhahhhaa. Many people are going crazy for this one. The good news is that it is easy breezy so you can whip this one up in a matter of minutes. All you need is:
- 2 large T-shirts (a cool color combination)
- Something circular (10-12in... or 25-30cm in diameter - a dinner plate would work)
- A pencil to trace the circles
- scissors
- Start by spreading the T-shirts out on a table, front side down- smooth any wrinkles.
- Use the plate to trace 4 circles on the back of each shirt, if you can fit that many (try not to trace over a collar or hem... or major designs... if you don't want them to be part of your scarf)
- Cut each of the circles out (cut through both sides of the shirt, giving you 2 circles for each cut)
- If you did 4 cut-outs for each shirt you should end up with 16 total circles.
- Pile the circles from the same shirt on top of each other (2 piles, one from each shirt)
- Cut the circle in a spiral - do this for each T-shirt pile of circles
- Separate the strands from each other and arrange them in a pleasing way.
January 18, 2012: Tearin' it up!
This is one of my favs! I always like doing different things with old T-shirts... and I guess that stems back to when my friends and I were in high school and we would go to thrift stores on a regular basis looking for the most beat-up and funky T-shirts we could find. As a result... I have a plethora of Ts. That, of course, does not stop me from buying more. Bag sales! Why not, when you can up-cycle to amazing accessories such as these?
How did I make it... hmmm. This one just might need a video or picture tutorial because it would be hard to explain in writing. I posted it to my Pintrest board for my creations and it is spreading like wildfire...So stay tuned, I will definitely follow up with a tutorial. Until then... just cut up those shirts and yank on the pieces, braid them and twist them until you have something fabulous!
January 17, 2012: Magnetizing
More bottle caps and resin. This time it is the real resin. The difference between this and the epoxy I have used in the past is astounding. It is so much clearer and dries much harder and smoother. Very exciting! I want to experiment with putting different things in resin. What I have realized is that I really need to make sure that any paper (magazine, book, etc.) that I put in resin is adequately covered in Mod Podge first... and dry. This will seal it from getting a wet look when I apply the resin. So, I did not get exactly what I was looking for here... but it's all about learning right!?
The first one I did is the one that has the dictionary words cut out: "seize, autonomy, friend." I love this pieced-together phrase because it is basically saying... "Dear Friend, go out and get yourself a life that you are in control of!" -Love Me Hahaha.
The second one I made is the "colorful abyss." I just picked out two words that described what the magnet itself looked like. There are colorful seed beads piled up inside the bottle cap and then secured with resin. For this one I did the beads first and when it was dried I put the words on top and added more resin. Two others have some seed beads poured into the bottle cap and resin over top... that's it! Each of the caps have magnets attached to the back.
January 16, 2012: A spoonful of time
While in visiting Milford PA a couple of weeks ago to get my tattoo, I discovered a cool little gift shop that had handcrafted jewelry on consignment. (WAIT WHAT... TATTOO!? Yes. Perhaps I will share more later.) On display were a bunch of rings and necklaces made out of old spoons. I had never seen this... but both my friend Jenny and my mom said that they had seen them before. Even though it seemed that this up-cycling of flatware was old news... I thought it was a fantastic idea. Why not capitalize on the very inexpensive excess metal?
I started this pendant by hammering an old spoon until it was flat. Then I filed, sanded and buffed it until it had the desired look and feel. Next I placed the watch piece on the surface of to see where I wanted to solder it on. I marked where it was going to go and then punched the word "flies" into the metal using a metal punch set that was picked up at a rummage sale. I tried a new technique, sweat soldering, to attach the watch piece to the spoon piece. It worked! Although, I imagine I will try something else in the future because the watch insides do not seem too fond of the heat... smokey... yikes! Perhaps some sort of cold connection? We'll see.
Then it was time to buff it up to the desired look. Again, as usual, I like the worn and beat up look so I did not shine it up too much. Once it had the look, I put a hole in the pendant so that I could connect the jump ring and put it on a chain. To make this hole I used a metal hole punch screw. Before attaching it to a chain I wanted to make the letters stand out more. To accomplish this, I had to oxidize the metal using an oxidizing agent. Oxidation (zing! science is everywhere!) happens as a result of a redox reaction (reduction/oxidation) where one substance is reduced (picks up electrons) and the other is oxidized (loses electrons). In this case, the metal is oxidized using a using liver of sulfur . This made the letters darker and less shiny, causing them to stand out and be easier to read. To finish up, I put a jump ring through the hole and then put it on a silver chain that I had from years ago.
I tried to put links to everything that I used so you can find what you need easier if you want to make something like this. Have fun!
January 15, 2012: Berry cinchy cowl :)
To be completely honest, I am not great at crocheting. As it turns out... I really do not like following patterns of any kind. Even in cooking, with recipes. I generally look at the basics of how to do something and then get creative with it. (FYI People do tend to like the things I cook... and no one has died, yet.)So, my crochet projects are generally cinchy - great word - and basic... but with a twist. I love the Threadbanger YouTube channel for learning cool DIY projects. This was the first crochet tutorial that I learned from. It is actually teaching how to make a slouch hat but you get the idea. With my limited crochet skills... I made some simple cowl scarves for my mom and sister this Christmas and they were a hit... and I wanted one for myself. When I made it, I thought it was a little to long; I wanted it tighter around my neck to keep me warmer. With that in mind, I incorporated a draw string in this one, where the strings come out of a little flower (which I have to get better at making). It slips over your head and then you can pull the strings to tighten it up for a warmer feel. Then, tie a little bow inside the flower. Cute and comfy.
Monday, January 16, 2012
January 14, 2012: It's a Wrap!
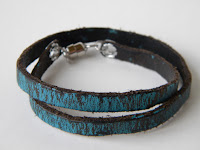
Today I revisited an old project that just did not end up quite right. To make this wrap bracelet originally, I took apart an old, black, braided leather belt. I took one of the strips of leather and hammered it and stretched it until it straightened out a bit. Once it looked straight and had the "worn" look that I was going for, I painted over the strip with turquoise acrylic paint. Once the paint dried I took either side of the strand in my hands and stepped my foot on the middle of the strand with the painted part hitting the bottom of my shoe. Then I moved the strand side to side, scraping it on the bottom of my shoe to make the paint peel and rub away. This gave it an old, beat-up look, which I love! When the strip of leather had the look I was going for it was time to figure out how to close the bracelet on my wrist. I punched holes in either end of the leather strip and added a rivet reinforcement. At the time, I added a silver chain and a crab-claw clasp. This was very difficult to close around my wrist. So, the bracelet sat around and I stared at it once in a while wondering how I could make it easier to close so I could wear it. Well, when I was in NYC recently I found some magnetic clasps. This was the answer to my dilemma! So now I am excited because my bracelet is much easier to take on and off :). I will probably be producing a bunch of these in the near future so stay tuned for an Etsy or Facebook link to purchase one if you are interested!
Labels:
accessories,
clasp,
DIY,
leather,
wrap bracelet
January 13, 2012: A Better Batch
I am branching into the DIY bath and body world and it is very exciting. There is much to learn about natural ingredients and various methods used to create the products. Today I learned all about making soap and I ordered the ingredients... so stay tuned for soap! Ok, so back to lip balm. I used the same procedure as the last batch but made some slight modifications to the ingredients. This batch includes beeswax, olive oil, sweet almond oil, shea butter, sunflower oil and peppermint oil. I also got this container at Michael's in the bead section. For a little bit o' shimmer and color I added something that is used in fondant and icing coloring. I got it at A.C. Moore in the cake decorating section. It was in a little vile and called "luster dust." I thought this would be a good addition for color because it obviously would not be harmful if it got in your mouth. I am waiting for the lip balm containers that I ordered and I still am not completely satisfied with the final product so... more to come!
January 12, 2012: It's a bird, It's a plane... It's an i-cord!
Disclaimer! PLEASE excuse these pictures! The attempt at zero expression, as ridiculous as it is, will hopefully allow you to focus on the piece and not my silly face. (Those of you who know me know I cannot take serious pictures...)
Now, I love this thing! It is a simple crocheted i-cord (similar to the very first creation on January 1st but shorter and with a lighter yarn size. (Here is a link that explains yarn measurements and descriptions, as it can get very confusing!... I have much to learn.) The coolest thing about this creation is that I do not really know what it is. It's a necklace... or a headband... or a choker-scarf-thing. Anyway, it fits nicely into my style and I think it could be worn across seasons so I just love it, alright!? :)
January 11, 2012: None of your Beeswax!
Today I made my own lip balm! Honestly, I am not even sure where I came up with the idea to it. Sometimes I am just thinking, "Gee... I wonder if I could make my own ____ (blank)." Then, I hit the computer and see where to start. So I guess that is how this project took root. The first tutorial that I watched, and most helpful, was by DIY Bath Body and Home on YouTube . There are soooo many tutorials out there though. If you are not interested in making a natural lip balm, you can mix Vaseline or Aquaphor with old eye-shadows or other coloring, which is very simple.
I did want to make a natural lip balm so I gathered some ingredients. Believe it or not, I had all of the ingredients for my first batch at home, but you can get any of this at A.C. Moore and your local grocery store. I used .5 ounces of beeswax, 1/2 cup of extra virgin olive oil, 1 tablespoon of honey, peppermint and orange essential oils. As shown in most videos, I used a double boiler to melt the beeswax. Then I added the olive oil, honey, and essential oils. This made enough to fill 12 tiny containers as shown in the picture. The entire process took about 1/2 hour! (I found these containers at A.C. Moore in the painting section) I gave the samples out from this first batch. I really cannot wait to get more creative with making bath and body products! I have since purchased several essential oils and shea butter from a local health food store and some other ingredients on Brambleberry.com. Stay tuned!
January 10, 2012: T-riffic Wall Decor
This was one of those nights when I felt awful. I wanted to make something new but I really could not spend too much time on it. Thinking back to a recent conversation with a friend, (Beth maybe... was it you?) I was inspired by the idea to use embroidery hoops to turn old fabric into interesting works of art for your wall. A simple internet search lead me to this pintrest site with all kinds of cool ideas! You can find and abundance of embroidery hoops in thrift stores where they sell for about 10 cents - 25 cents a piece. Needless to say, my project for this night in particular is less than stellar... but I got something done and opened a can of worms for future projects! This one is the back of a 2010 World Cup T-shrit. The front of the shirt was an advertisement for Guinness, which I do enjoy but I never wore the shirt. I cut out the soccer ball and put it on the embroidery hoop. Viola! Not overly involved but it does look pretty cool. Perhaps I will add to it later.
January 9, 2012: Nothing to Waste!
Having long hair all of my life... (well... that is, since I was old enough to make my own decisions about my hair...) I have had an interest in cool ways to wear my hair and fun things to put in my hair. I had some tie dye T-shirt material left over from the scarf from Sunday so I decided to make some headbands. (Nothing to waste! It is always a good idea to keep your scraps! I will show you something fun to do with your scraps in a future post.) For each headband I used 4 (about) 20 inch T-shirt strands. Specifically, I used 2 brown and 2 tie dye strands for each. The first one is a 4-part round braid (this is the video that I originally learned this braid from... it is with leather but the technique can be used with your hair, T-shirt material, leather, or whatever! http://youtu.be/0afO40tsqAc ) The second one is also a 4-part braid but flat. This braid can be done a couple of ways. The way this one is made is by taking the strand on the left and going (to the right) over, under, over. Then a new strand is on the left... take that one and do the same: over, under, over. Repeat. There are tons of tutorials out there on different kinds of braids so just get the gist of it and then be creative!
January 8, 2012: Tired to Tie Dye
One of my favorite creative pastimes is making t-shirt scarves. They are ridiculously simple and always result in a fun, versatile accessory! So, on this Sunday evening, post blog-updating and school-week-prep, I found myself incredibly exhausted... yet committed to continuing my daily creations. I had just purchased two old tie dye T-shirts from the Salvation Army so I decided to whip up a scarf. To make this scarf/necklace, start by cutting the T-shirt straight across from armpit to armpit. Next, cut off the bottom hem of the shirt. This should leave you with a rectangular piece of T-shirt. The piece should be in one connected loop. Cut strips (about 1 inch wide) from side to side. When you have all of your strips, pick them up individually and pull them so that the T-shirt material curls up and forms a noodle-like shape. Each strip should now be curled up. Put them together and you have your noodle scarf! Many more variations to come! Check out this great tutorial I found! : http://madethislovethis.com/made/tshirtscarf/
Sunday, January 8, 2012
January 7, 2012: A Bottle of Luck
Back to the bottle! No, no... bottle caps and epoxy! After hammering the heck out of a bottle cap the other day I noticed that the edges would turn in on their own, rather than out. So I decided to try to Mod-Podge some cool designs in the back and let the cap pin the paper in when I hammered it flat. After I had the background I was actually satisfied with the look. But, then I looked at the magazine that I had just cut the images out of and I saw the words "lucky girl" and I know I had to incorporate those words somehow. Once I glued the words on to the background I punched holes in the caps using a metal hole puncher. Then I placed the caps on top of each other, lining up the holes, and used rivets to stick them together. Next I put epoxy over the words and waited for that to dry. Lastly, I attached the chain and clasp. I plan to wear this one... after all... I am a truly lucky girl! (a kid at heart!)
January 6, 2012: Suzie Homemaker Hair Tie
This past June I went to Atlantic City to the Dave Matthews Caravan. It was a three-day music festival featuring many of my favorite bands... thrilling... a great way to start my summer. While I was there I bought a cool headband that was made in Indonesia. There was a deal where you could buy three for twenty dollars but I only bought one. Why? Well, because I looked at it and thought.. I can definitely make these. It was not until Friday after returning home from Ski Club that I actually put my sewing machine where my mouth was.
This headband is made out of an old plaid, button-down shirt and some elastic. It is called the Suzie Homemaker Hair Tie because I made it for my sister. She loves plaid, country-looking things and she has great hair... and a lot of it! She has two little, very energetic boys and is always busy being the best mom ever. Now she can do that with her hair held back in a country-chic homemaker hair tie!
January 5, 2012: Wrap it up!
One of my favorite jewelry trends is the wrap bracelet. And, as I have mentioned before, I have been collecting old leather belts from thrift stores and rummage sales. Also, this is a great time to mention that I am a huge fan of upcycling, so you will see much more of old things becoming new things!...For this brown, leather creation, I took apart one of those braided leather belts and stretched and hammered the strands until they were somewhat straight and softened (not too straight though because I like the worn, rugged look of them). As you can see, I made two separate bracelets; one is braided with chain and the other contains two plain strands. I used little clamp ends that you basically just hammer closed on the ends of the leather. then I attached magnetic fasteners, which are fabulous! A frustrating thing about wrap bracelets is that they can be a pain to close... not these ones! I found these clamp ends and closures at a Bead World on Broadway (around 37th street) in NYC. My favorite thing about these are the fact that you could wear them separately or you can use the opposite magnetic ends and make one large wrap bracelet or even a funky necklace (with the braided chain one hanging in front and the plain one behind your neck). Cool look :)
Wednesday, January 4, 2012
January 4, 2012: Time Flies!
Shhh... my mother hoards jewelry findings! Haha... lucky for me :). I have seen many old watch pieces piling up over the years and always thought they would make great additions to some other jewelry item. What better time than now? I had been talking about making rings and other types of metal jewelry pieces for a while and this Christmas my mom gave me a gift certificate for a jewelry lesson with.... HER. So I had a quality one-on-one lesson and learned the basic techniques of annealing, soldering (just learned how to spell that!) and working with various types of metals. Soldering is the use of a fusible metal alloy (metal containing more than one element) to create a joint or connection between two metal pieces. (I did not know that definition before.)
I started with a sterling silver rod and hammered it so it was flat. Then I hammered it to form a circle. I did this around a mandrel to get the correct size. Then I soldered the ends of the ring together to form a continuous circle. Next I soldered on the old watch piece. I finished up by polishing, polishing and polishing!
January 3, 2012: Bloom Necklace!
Have you ever seen cool jewelry made of bottle caps with some picture in it and a hard clear coating over it? I bought two great necklaces like this; one from a market in Nova Scotia that says "Earth" and the other from a street vendor in Union Square, NYC. I always look at this type of jewelry and say... "Oh I could make that." However, until yesterday (January 3rd 2012!) I had not even tried. I have been talking about making resin jewelry for years. So much that I have actually received resin as a gift several times... haha. That being said, I actually did not use the resin I received for this project. Instead I used epoxy resin (much like glue) which is why there are so many bubbles I think. But... at least I got the ball rollin' right? I will be sure to make genuine resin jewelry in the future and post it.
To make the pendant I took a bottle cap and sanded off the emblem on the flat side. Then I cut the rigid rim off leaving just enough to create a shallow dish-like structure. Then I painted Mod Podge all over the inside of the cap. Then, while that was drying, I cut out the floral magazine image into a circle and coated it with Mod Podge. I added the cutout of the word "Bloom" and stuck it to the front of the circle. I painted the image into the cap with more Mod Podge and waited for it to dry. Then I mixed equal parts of each compound to make the epoxy. I scooped the epoxy into the cap and tried to spread it out without causing too many bubbles. Then I let it dry. Meanwhile I found the brass leaf charm and used the epoxy to stick it to the back of the bottle cap. When everything had set, I attached a jump-ring and put it on a chain from an old necklace!
Ok... get ready for it! You would not believe what I learned about epoxy. Being a biology teacher, naturally, I was curious about the chemical reaction between the two parts of the epoxy mix. Basically you have to mix the two glue-like materials together in equal parts to cause it to harden. When I looked up the chemistry behind this (on Wikipedia... where else?) I was pleasantly surprised to find out that the first compound (resin compound) is made up of monomers (zing! bio word) and so is the hardener. When you mix the two together, the monomers form an intricate cross linked polymer! Huh! This causes it to form a very hard solid that is used in jewelry making, electron microscopes, plexiglass and much more.
Tuesday, January 3, 2012
January 2, 2012: Leather Cuff
I have always admired cool leather cuff bracelets. After scouting Etsy and some funky street markets in NYC I started buying used leather belts at thrift stores and rummage sales. Now I have a beastly collection! This past summer I played around with making a couple of cuffs. My father works with tons of leather for work and also has a snap fastener and hole punchers, etc. Naturally, having tools available made my dreams of creating leather cuffs more realistic. So the crafting began :). However, I had seen all types of bracelets that had different types of fabric, metal, other leather pieces, etc. attached to the leather cuff with metal fasteners. Well, this 2012 endevor inspired me to see what I could do. I learned the difference between rivets, grommets and eyelets. Not an easy task! Rivets are solid on top and are used to fasten two pieces of fabric together. Grommets (larger) and eyelets (smaller) have holes in them, creating a reinforced hole in the fabric. Anyway... I found rivets at A.C. Moore and used them to stick two pieces of leather (from repurposed leather belts) together. I stamped the word "live." in the top piece. Check it out!
January 1, 2012: I-Cord Necklace... or is it a scarf??
This is my first creation of 2012. I saw it on Etsy and wanted to learn how to make one. So, naturally (as most people would do) I Googled it! Specifically I searched "crochet cord." This led me to a YouTube tutorial on how to crochet an i-cord. I grabbed a giant crochet hook, turned on the miserable Jets game :( and crocheted away. By the time the Giants were running away with Dallas, I was done! Check it out!
Welcome 2012!
Welcome New Year!! This New Year's Eve I was struck with a memory of several New Years ago. My mother made the lofty goal to create an artist trading card every day for a year. By the next New Year's Eve, she had accomplished her goal. A binder, full of 365 artist trading cards will live on to commemorate her year of creativity and discipline. Inspired by this story and a growing library of books I have been reading, fueled by my passion for creating and learning, I have set out to either create something new or learn something new each day in 2012. In keeping with the Period Ten theme, my "new thing" each day will have to be something I am interested in learning/doing/creating... that is not a part of my work day. Please comment and/or share something new you have created or learned! I hope you enjoy each new something :)
Subscribe to:
Posts (Atom)